こんにちは、蛯沢です。
ここ最近、急に寒くなってきましたね。
みなさま、風邪などひいておられませんか?
これから冬にかけて、空気が乾燥してくるとインフルエンザなどのウイルスに感染しやすくなります。
オフィス内には加湿器があるのですが、加湿器から少し離れた場所でも、本当に加湿できているでしょうか?
実際にログを取って調べたくなったので、湿度ロガー(ついでに温度と気圧も)を作ってみました。
湿度ロガー
というわけで本題です。arduinoで温度、湿度、気圧ロガーを作ってみました。
作成にあたって、下記のサイトを参考にさせていただきました。
https://www.mgo-tec.com/blog-entry-ss-wroom-howto01.html
arduino自体は触ったことはなかったのですが、プログラムと多少の電子工作知識があれば出来そうだったので早速スイッチサイエンスさんでポチりました。
ESP-WROOM-02開発ボード
https://www.switch-science.com/catalog/2500/
BME280(温度、湿度、気圧センサー)
https://www.switch-science.com/catalog/2323/
ブレッドボードで配線します。

上記サイトを参考に、Arduino IDEをインストール、設定。
センサー(BME280)のライブラリはこちらを利用させていただきました。
コードもほぼコピペからの修正ですが、何とか動くようになりました。
#include <ESP8266WiFi.h>
#include <BME280_SPI.h>

const char* ssid = "abcxyz";
const char* password = "password123";

boolean Ini_html_on = false;//ブラウザからの初回HTTPレスポンス完了したかどうかのフラグ

const uint8_t sclk = 14; //OLED & SDcard & BME280 SCLK
const uint8_t mosi =13; //Master Output Slave Input ESP8266=Master, BME280 & OLED & SD = slave
const uint8_t miso =12; //Master Input Slave Output
const uint8_t cs_bme = 2; //BME280 CS(ChipSelect)

BME280_SPI bme280spi(sclk, mosi, miso, cs_bme); //BME280ライブラリクラス定義。ここでSPI通信のピン設定をする


WiFiServer server(80);
WiFiClient client;

void setup() {
  uint8_t t_sb = 5; //stanby 1000ms
  uint8_t filter = 0; //filter O = off
  uint8_t osrs_t = 4; //温度オーバーサンプリング。x1,x2,x4,x8,x16 高ければ精度が上がるが測定時間がかかる
  uint8_t osrs_p = 4; //気圧オーバーサンプリング。 x4
  uint8_t osrs_h = 4; //湿度オーバーサンプリング。 x4
  uint8_t Mode = 3; //Normal mode


  bme280spi.BME280_SPI_Init(t_sb, filter, osrs_t, osrs_p, osrs_h, Mode);

  Serial.begin(115200);
  // Connect to WiFi network
  Serial.println();
  Serial.print("Connecting to ");
  Serial.println(ssid);

  if (WiFi.status() == WL_NO_SHIELD) {
    Serial.println("WiFi shield not present");
    while(true);  // don't continue
  }

  IPAddress ip(192, 168, 1, 15);

  bool connected = false;
  WiFi.config(ip);
  for( int i = 0; i < 10; i ++ ){
    WiFi.begin(ssid, password);
    delay(100);

    for( int j = 0; j < 100; j ++ ){
      delay(500);
      if(WiFi.status() == WL_CONNECTED ){
        connected = true;
        break;
      }
      Serial.print(".");
    }
    if( connected == true ){
      break;
    }
    Serial.println("Retry");
  }
  if( connected != true ){
    Serial.println("failed WiFi connect");
    while(true);  // don't continue
  }
  Serial.println("");
  Serial.println("WiFi connected");


  // Start the server
  server.begin();
  Serial.println("Server started");

  // Print the IP address
  Serial.print("IP Address: ");
  Serial.println(WiFi.localIP());

}


void loop() {
  if(Ini_html_on == false){
      Ini_HTTP_Response();
  }else if(client.available()){
    Serial.print(client.read());
  }
  delay(1);//これは重要かも。これがないと動作かも。
}

void Ini_HTTP_Response()
{
  double temperature = 0.0, pressure = 0.0, humidity = 0.0;

  client = server.available();//クライアント生成
  delay(1);
  String req;
  char temps[16], presss[16], humids[16];

  while(client){
    if(client.available()){
      req = client.readStringUntil('\n');
      Serial.println(req);
      if (req.indexOf("GET / HTTP") >= 0 || req.indexOf("GET /favicon") >= 0){
        Serial.println("-----from Browser FirstTime HTTP Request---------");
        Serial.println(req);
        //ブラウザからのリクエストで空行(\r\nが先頭になる)まで読み込む
        while(req.indexOf("\r") != 0){
          req = client.readStringUntil('\n');//\nまで読み込むが\n自身は文字列に含まれず、捨てられる
          Serial.println(req);
        }
        req = "";
        delay(10);//10ms待ってレスポンスをブラウザに送信

        pinMode(miso, INPUT); //bme280を複数デバイスのうちで使う場合はこれがないと計測できない
        temperature = bme280spi.Read_Temperature();
        pressure = bme280spi.Read_Pressure();
        humidity = bme280spi.Read_Humidity();
        dtostrf(temperature,5,1,temps);
        dtostrf(humidity,5,1,humids);
        dtostrf(pressure,5,1,presss);

        client.print(F("HTTP/1.1 200 OK\r\n"));
        client.print(F("Content-Type:application/json; charset=utf-8\r\n"));
        client.print(F("\r\n\r\n"));
        client.print(F("{\r\n"));
        client.print(F("  \"id\": 1,\r\n"));
        client.print(F("  \"temperature\": "));
        client.print(temps);
        client.print(F("\r\n"));
        client.print(F("  \"humidity\": "));
        client.print(humids);
        client.print(F("\r\n"));
        client.print(F("  \"pressure\": "));
        client.print(presss);
        client.print(F("\r\n"));
        client.print(F("}\r\n"));

        delay(1);//これが重要!これが無いと切断できないかもしれない。
        client.stop();//一旦ブラウザとコネクション切断する。

        Serial.println("\nGET HTTP client stop--------------------");
        req = "";
        Ini_html_on = false;  //一回切りの接続にしたい場合、ここをtrueにする。
      }
    }
  }
}
これで簡易httpサーバーとして動くようになり、GETリクエストで、温度、湿度、気圧をjsonで取得できるようになりました。
$ curl http://192.168.1.15/
{
  "temperature": 25.4,
  "humidity": 45.5,
  "pressure": 1005.5
}
グラフ化する
次にこれをグラフにします。グラフ化するには、muninを使用します。
muninのプラグインスクリプトはperlで書かれているものが多いので、なんとなく合わせてperlで書きました。
#!/usr/bin/perl
require HTTP::Request;
require LWP::UserAgent;
use JSON;
if ( defined $ARGV[0] and $ARGV[0] eq "config" )
{
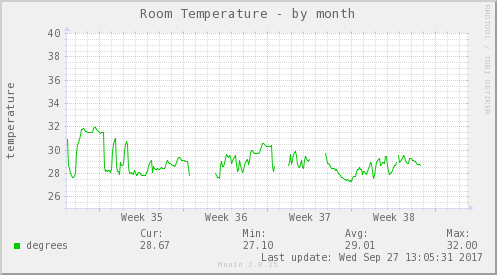
print "graph_title Temperature\n";
print "graph_vlabel temperature\n";
print "graph_category Office Environment\n";
print "graph_info Development room\n";
print "temperature.label degrees\n";
print "temperature.info The current temprature\n";
exit 0;
}
$request = HTTP::Request->new(GET => 'http://192.168.1.15/');
$ua = LWP::UserAgent->new;
$response = $ua->request($request);
if ($response->is_success) {
$data_ref = decode_json( $response->content );
print "temperature.value $data_ref->{'temperature'}\n";
}
同様に、湿度、気圧のスクリプトも用意します。
#!/usr/bin/perl

require HTTP::Request;
require LWP::UserAgent;

use JSON;

if ( defined $ARGV[0] and $ARGV[0] eq "config" )
{
        print "graph_title Humidity\n";
        print "graph_vlabel humidity\n";
        print "graph_category Office Environment\n";
        print "graph_info Development room\n";
        print "humidity.label percent\n";
        print "humidity.info The current humidity\n";

        exit 0;
}

$request = HTTP::Request->new(GET => 'http://192.168.1.15/');
$ua = LWP::UserAgent->new;
$response = $ua->request($request);
if ($response->is_success) {
        $data_ref = decode_json( $response->content );
        print "humidity.value $data_ref->{'humidity'}\n";
}
#!/usr/bin/perl
require HTTP::Request;
require LWP::UserAgent;
use JSON;
if ( defined $ARGV[0] and $ARGV[0] eq "config" )
{
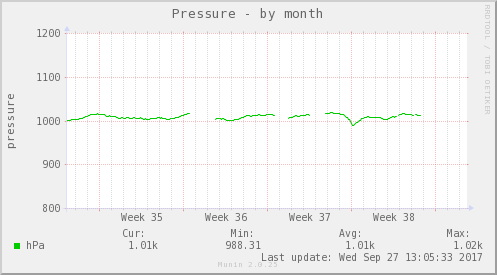
print "graph_title Pressure\n";
print "graph_args --units-exponent 0 --lower-limit 850\n";
print "graph_vlabel pressure\n";
print "graph_category Office Environment\n";
print "graph_info Development room\n";
print "pressure.label hPa\n";
print "pressure.info The current pressure\n";
exit 0;
}
$request = HTTP::Request->new(GET => 'http://192.168.1.15/');
$ua = LWP::UserAgent->new;
$response = $ua->request($request);
if ($response->is_success) {
$data_ref = decode_json( $response->content );
print "pressure.value $data_ref->{'pressure'}\n";
}
用意した3ファイルを /usr/share/munin/plugins に置き、/etc/munin/plugins/ からシンボリックリンクを張ります。
このようにグラフ化できました。
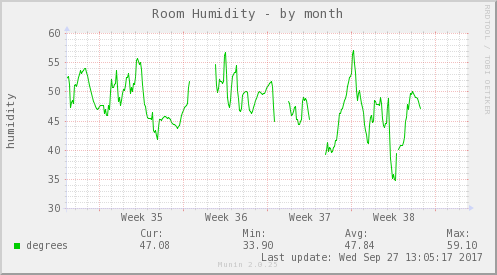
ログを取ってみた結果
湿度は時間(昼or夜)や天候などでもかなり変化するため、数日かけて加湿器で加湿したり、しなかったりしばらくログを取ってみたところ、一般家庭用の加湿器でもそれなりの範囲は加湿できることが分かりました。
1台で開発エリアをカバーすることはさすがに無理ですが、数台あれば大丈夫そうです。
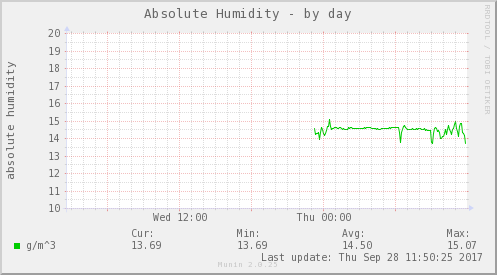
絶対湿度?
これでセンサー情報をグラフ化出来ました。
しかし、いろいろ調べたところ、湿度には相対湿度と絶対湿度があり、インフルエンザウイルスの感染には絶対湿度が重要なのだそうです。
なので絶対湿度もグラフで表示できるようにしてみました。
正確な計算式は複雑なので、近似式がいくつかあるようなのですが、今回は簡単なTetens式を使いました。
#!/usr/bin/perl

require HTTP::Request;
require LWP::UserAgent;

use JSON;

if ( defined $ARGV[0] and $ARGV[0] eq "config" )
{
        print "graph_title Absolute Humidity\n";
        print "graph_vlabel absolute humidity\n";
        print "graph_category Room Environment\n";
        print "graph_info Environment in the development room.\n";
        print "humidity.label g/m^3\n";
        print "humidity.info The current absolute humidity\n";

        exit 0;
}

$request = HTTP::Request->new(GET => 'http://192.168.1.15/');
$ua = LWP::UserAgent->new;
$response = $ua->request($request);
if ($response->is_success) {
        $data_ref = decode_json( $response->content );

        $temp = $data_ref->{'temperature'};
        $humid = $data_ref->{'humidity'};
        $e = 6.1078 * 10.0 ** ((7.5*$temp)/(237.3+$temp));
        $abshumid = 216.674 * ($humid * $e) / (100.0 * ($temp + 273.15));
        $str = sprintf( "%.2f", $abshumid );

        print "humidity.value $str\n";
}
湿度と同様にmuninのプラグインとして仕込みます。
インフルエンザ注意報でウイルス感染を防ぐ
グレッゾ社内ではmattermostというチャットを使用していて、トトという名前のbotと会話できるのですが、このトト君にインフルエンザ注意報を投稿するようにスクリプトを書いてみました。
こちらのサイトを参考に、11g/m3以下なら注意報、7g/m3以下なら警報とします。
cheerio = require 'cheerio-httpcli'
cronJob = require('cron').CronJob

module.exports = (robot) ->

  cronjob = new cronJob('0 0 10 * * 1-5', () =>
    envelope = room: "town-square"
    msg
    .http("http://192.168.1.16/")
    .get() (err, res, body) ->
      data = JSON.parse(body)
      temp = data.temperature
      humid = data.humidity
      e = 6.1078 * Math.pow(10.0, ((7.5*temp)/(237.3+temp)))
      abshumid = Math.round(216.674 * (humid * e) / (100.0 * (temp + 273.15)),1)
      if abshumid > 7 and abshumid <= 11
        msg.send envelope, "今日の開発室はインフルエンザに感染しやすくなっています。注意してください。"
      else if abshumid <= 7
        msg.send envelope, "今日の開発室は非常にインフルエンザに感染しやすい状態です!必ずマスクをしましょう!!"
#      else
#        msg.send envelope, "感染しにくいです。"
  cronjob.start()
cronで平日の午前10時に投稿するようにしてみました。
これでインフルエンザ等の感染者が少しでも減ることを期待しています。